Many people have a holiday tradition of eating dried orange slices. Discover how to dry orange slices for holiday decorations, an orange garland, cocktail garnishes, and more.
Slices of orange can be used as ornaments, garnishes, potpourri ingredients, garlands, wreaths, and another holiday décor. Thankfully, drying orange slices at home is very simple. Plus, while they’re drying, they fill your house with a wonderful aroma.
Table of Contents
Why Dry Orange Slices?
Numerous applications exist for dried orange slices. We will demonstrate how we use ours in the future. The fact that they retain their fragrance even after drying is the best part. The orange slices’ long shelf life is another advantage.
They work well in garlands for the holidays or the fall. You will learn how to make potpourri as well, which you can use for gifts or for your home.
Making your own orange slices for drying is also cost-effective. You can see how I used fresh oranges in my crock pot fall potpourri.
What Kind of Oranges Should I Use to Make Dry Orange Slices?
Classic Navel or Valencia oranges are best. They produce the most exquisite dried orange slices because they are large and consistently round in shape. Choose oranges with the deepest orange color rind for the most vibrant results. Also, firm oranges will be easier to cut into uniform thin slices than softer fruit.
Additionally, we have made dry orange slices in the past using blood oranges. It looks amazing with the gorgeous red and purple centers! It’s crucial to avoid overcooking or burning them, though, as they will appear even more browned than the orange ones because they are already darker in color.
Really, you can use these methods to dry any type of citrus – including lemons, limes, or grapefruit! Note that smaller “orange” citrus fruits like tangerines or mandarins typically have thinner rinds and more membranes inside, so they can be less attractive when dried.
How to Make Dried Orange Slices?
Supplies
- Oranges
- Sharp knife and cutting board
- Baking sheet lined with parchment paper (for oven method) OR a food dehydrator
- Lint-free cloth towel or paper towels for blotting
Instructions
Step 1: Slice the Oranges
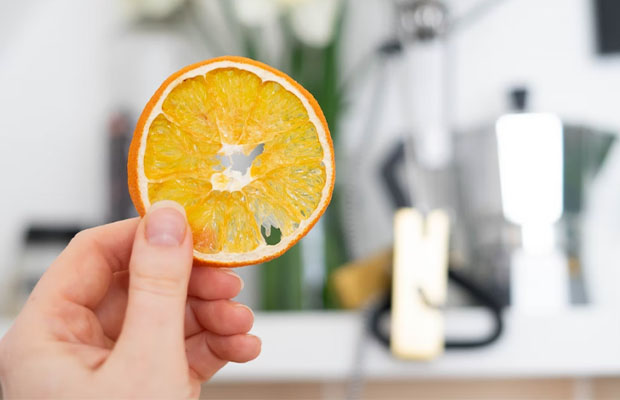
Slice up your oranges thinly to start. Aim for ⅛” to ¼” thick. Try your best to cut each slice with the same thickness. The more thin and even you cut them, the faster and more uniform they’ll dry. Also, cut across the “equator” or center of the orange (as opposed to top stem to bottom) to reveal the perfect cross-section.
Tip: Now is a good time to preheat your oven to 200-225°F. See more details about the expected temperature range.
Step 2: Blot and Spread
Before putting the orange slices onto trays, it’s best to blot them to remove excess juices first. They dry much more quickly as a result and adhere to the trays less. Some individuals do this using paper towels. As an alternative, I prefer to spread a lint-free tea towel out, place a few slices on top, and then fold it over to blot the tops. Don’t squish or push them too hard! Not much, just enough to absorb some juice. (Recommendation: After using the towel, give it a thorough rinse in water before putting it in the laundry.)
The next step is to spread the orange slices out on your dehydrator trays or a baking sheet. If you’re using the oven method, line the baking sheet with parchment paper first. Oranges get sticky! Lay the slices out in a single layer. Their sides should not overlap, but touching is acceptable.
Step 3: Dry Orange Slices
In a Dehydrator:
- To dry orange slices in a dehydrator, set the thermostat to 130-135°F.
- If your machine doesn’t have a precise temperature control, choose a “fruit” setting or medium heat. If in doubt, check them after an hour or two to make sure they aren’t turning brown and make any necessary adjustments.
- Dry them off until there is no moisture left. ((For more information, see the notes below.) In our machine, it took about 8 hours for the orange slices to become mostly dry, but a few damp pieces persisted, so I lowered the temperature to 125F and left it to run another night to finish the job.
- Your dehydrator’s specifications (for example if it has a top or bottom fan), you may also want to rotate the trays after several hours to promote even drying. With our Excalibur, there is no need to do this because the fan is in the back of the machine for more even airflow.
In the Oven:
- Dry the orange slices in the oven on 200 to 225°F for several hours, until they’re fully dry*. (See notes below)
- Depending on your oven and the size of the orange slices, it should take 3 to 5 hours.
- To ensure an even drying process, carefully flip the slices every hour or so.
- The dried orange slices should be moved to a cooling rack once they are finished.
A note on oven temperature: You might need to experiment to find the temperature that works best for you because every oven is a little bit different. In our current oven, I found that 200°F felt like it was taking a little too long, but when I turned it up to just over 225°F, the oranges quickly began turning more brown. I then reduced it again to around 215 for the remainder of the time. It took about 4 hours to complete this particular batch. At that point, I took out the dry slices, which was the majority of them, and left a few thicker slices to dry for an additional 30 minutes.*The orange slices are considered “fully dry” once they appear dry, and thickest parts of the fruit are no longer gooey or soft to the touch. They can still feel a tiny bit sticky, but that’s okay because once they are taken out of the heat, they will continue to dry and harden.
Read More: How to Make Orange Garland?
Ways to Decorate With Dried Orange Slices
- Add twine or string to your dried orange slices by making a small hole near the top, and tie a knot around the rind if needed (since it’s the most sturdy part). There may be a hole in the middle of a dried orange slice that can be used to thread string instead.
- Attach dried orange slices to green wreathes or garlands using twine, wire, or pipe cleaners. See photos below.
- String up dried orange slices as tree ornaments using ribbon, twine, or string. Get creative and add bows, bells, beads, feathers, or other enjoyable embellishments.
- Create a dry orange garland by stringing your orange slices on twine or string, either alone or together with popcorn, wood beads, cinnamon sticks, pinecones, or similar seasonal items. These look lovely strung across a sunny window, doorway, or fireplace mantle, streaming down a staircase banister, and on a Christmas tree.
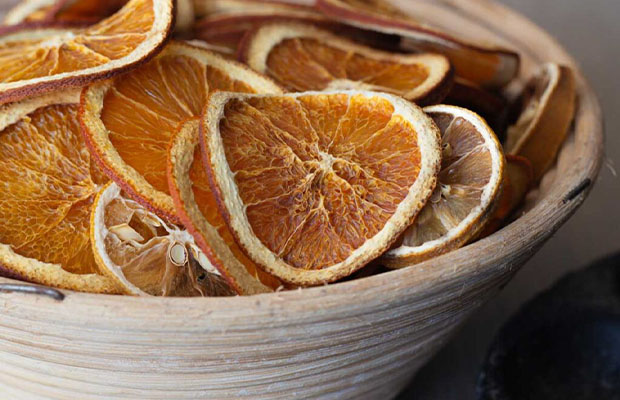
- Combine dried orange slices with natural greenery like pine or cedar, sprigs of rosemary, rustic pine cones, branches, acorns, chestnuts or walnuts to create a festive centerpiece, such as in a shallow bowl or tray.
- When wrapping gifts, affix them to the package with twine in lieu of curling ribbon or a bow.
- Last but not least, stick a dry orange slice or two inside your favorite tea, holiday cocktail, or mocktail for a beautiful citrusy flair.
Tips for Getting the Best Dried Orange Slices
Tip 1: Slice Oranges Very Thin
When slicing your oranges, make sure the knife is sharp. To ensure even drying, you should aim to make the slices roughly the same thickness. Aim for 1/4-inch-thick slices because they will be more flavorful.
When slicing fruit, a mandolin is a great tool for ensuring uniform thickness. Before continuing with the mandolin, simply slice off one end of the orange to make the surface even.
Tip 2: Dry Excess Moisture before Baking
Before putting the orange slices in the oven, dab each side with a paper towel. The fruit gets a head start on dehydrating as a result.
Tip 3: Bake Orange Slices in the Oven at Low Heat
I tested the oven-drying method at two different temperatures: 175°F and 200°F. Either is fine, but if you have the time, go low and slowly.
Despite needing to wait a little while for them to finish, the orange slices I baked at 175°F had better color and texture. (Play the Jeopardy theme music.)
It can take up to 6 hours to thoroughly dry your citrus fruit at 175°F, while the slightly higher temp takes closer to 4 hours.
I find it helpful to use a baking rack with parchment paper underneath to bake the slices more evenly and prevent the cookie sheet from getting sticky.
Tip 4: Flip Orange Slices Each Hour
Set a timer to remind you to turn the orange slices over every hour or so while baking. As a result, the oranges dry evenly and maintain their flat shape as opposed to curling.
It will be easier to determine when the slices are dry enough if you check them every hour.
Tip 5: for a Culinary Treat, Add Sugar Or Spices
Try sprinkling on some sugar, cinnamon, and/or ginger before using your orange slices as a garnish for a cocktail or in a holiday punch. The result will be a caramelized slice that is delicious.
While on vacation, a sugared orange slice was served along with my sangria. It was heavenly!
Read More: How To Make A Scrunchie?