
An inexpensive and elegant homemade holiday decoration is an orange garland. To make your own, simply follow my detailed instructions!
My new favorite activity is tying dried orange garlands to various surfaces throughout our home. It’s the ideal activity to do with the kids while seated around the kitchen table taking in a holiday film because it’s so endearing, enjoyable, simple, and inexpensive to make.
How to make orange garland? As simple as this garland is to make, the only thing you really need is time. Do this on a day when you’re relaxing at home and working from home—a day when you don’t need to go anywhere. Let’s start!
Table of Contents
Things You’ll Need for Dried Orange Garland
Oranges. Four navel oranges were used. Look for oranges with thicker skin when you are at the store. I think this makes for a prettier garland and
Sharp knife or a mandolin I adore my mandolin and frequently use it to slice vegetables. If you don’t have one, try your best to slice them all evenly with a sharp knife.
Paper Towel. In addition, you can squeeze any extra juice from the orange slices using a fresh dish towel.
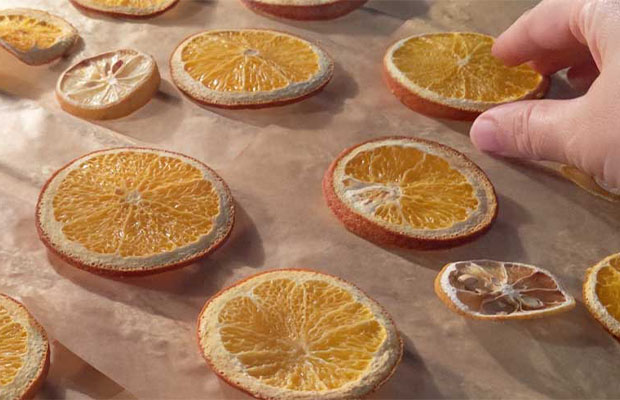
Baking Sheet. I lined a single, sizable baking sheet with parchment paper. The orange slices should be in a single layer and not overlap. If the edges touch, that is acceptable; just make sure they are not overlapping or stacked on top of one another.
Toothpick. We’ll poke holes in the orange slices with a toothpick or skewer after they’ve finished baking so we can string them together! You can simply skip this step if you’re not using the dried orange slices as garland.
String. To hang this orange garland, I adore using a rustic twine. But if you’d like, you can also use yarn, clear fishing line, or any other string you have on hand!
How to Make Dried Orange Garland?
Easy to make dried orange garlands. Here is our detailed instructions.
Step 1: Turn on the Oven
The oven should be preheated to 225°F. However, this is not required. I prefer to use the convection setting on my oven because it moves the air around more.
Step 2: Prep Cookie Sheets
Put parchment paper on cookie sheets.
I set out three cookies sheets as I wanted to make enough orange slices to create a long garland as well as hang extra slices on Christmas trees around the house
Step 3: Slice Oranges
On the cookie sheets, arrange orange slices in a single layer that are between 1/8 and 1/4 inch thick.
Use a paper towel to blot to get rid of extra moisture and hasten the drying process.
Related Reading: How to Dry Oranges Slices?
Step 4: Bake Oranges
Place in the oven and bake for roughly three hours at 225°F, or until the oranges begin to dry out and turn a light shade of brown.
To help the oranges brown evenly and dry on both sides, you can flip them halfway through baking.
Not all ovens are created equal, and many readers have reported that they had to lower the oven’s temperature to prevent the orange slices from burning. If your oven is on the warm side, you could start at a temperature of just 170°F and see how it goes!
Step 5: Let Orange Slices Cool
Let the slices of orange cool. I made my garlands after letting mine sit on the tray to cool for a few hours; they smell so good. They would just continue to dry by hanging up, I thought. However, if you desired, you could put them on a cooling rack and leave them outside for a few days to ensure that they were exceptionally dry.
Step 6: String Oranges & Decorate
On a clear fishing line, dangle the oranges. Not the rind of the orange, but the flesh!
You can string them closely together or, as I did, leave 1-2 inch gaps between them for a more understated appearance.
Because of the fishing line’s invisibility, the oranges appear to be floating. As I did above our kitchen sink, trim a cedar or fir garland with a string of oranges!
FAQs
The most frequent inquiries I’ve received regarding my dried orange garlands are addressed in the following list.
How Long Do Orange Garlands Last?
If kept in an airtight container and kept in a cool, dry location during the Christmas off-season, it can last for about two years.
How Long Do You Bake Orange Slices for Garland?
Oven should be preheated to 250 degrees Fahrenheit. Slice your oranges into sections measuring 1/8 to ¼ inch, and then pat them as dry as you can with a cloth. On baking pans with parchment paper already on them, arrange your orange slices in a single layer. Start to bake the oranges in a preheated oven for about 2 ½ hours.
Does Dried Orange Garland Attract Bugs?
Nope! Just make sure to completely dehydrate the orange slices. They might draw bugs or rot if there is any moisture left. However, the longer the orange slices are left out, the more they will likely dry out.
Does Dried Orange Garland Smell?
Oranges in the oven smell AMAZING as they bake! Once dried, they still have a faint scent, but it’s not overpowering.
What Are Ways to Customize This Garland?
I like the way a solid dried orange garland looks, but you can change it up by adding some wooden beads, tiny pine cones, or even a few small branches from your Christmas tree.
Can You Add Spices to Your Dried Orange Garland?
To your dried orange garland, you can most certainly add spices. In order to test it out, I’m actually going to add some cinnamon to mine this year! If you want to spice up your garland even more, I’ve also seen beautiful garlands made with cinnamon sticks, bay leaves, and other dried fruits like cranberries or grapefruit!
What Else Can I Do With Dried Oranges?
Place a variety of items in a small bowl and display it in your bathroom for a cheerful, upbeat look. Use them to adorn these Orange Pie Bars or a cake with orange frosting!
They can be used to decorate gift card envelopes or be affixed to gifts.
Final Words
Do you have any prior experience creating dried orange garland? Or cranberries and popcorn strung together? It’s just a little detail from the “good ol’ days” that makes me feel connected to the previous Christmases.
This garland looks great draped across a mantle, a cabinet, inside a Christmas tree, or just on the wall! While it does require some time, the effort is well worth it.
Read Next: