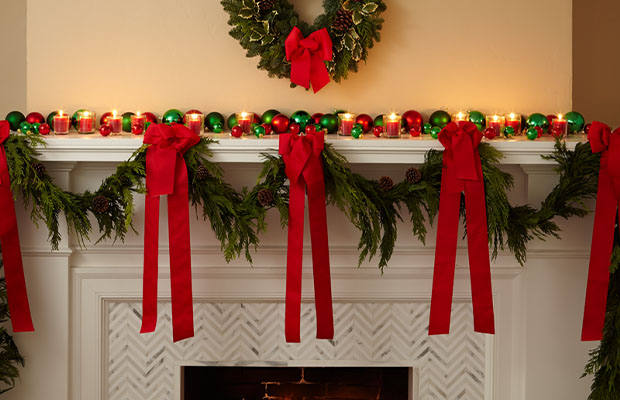
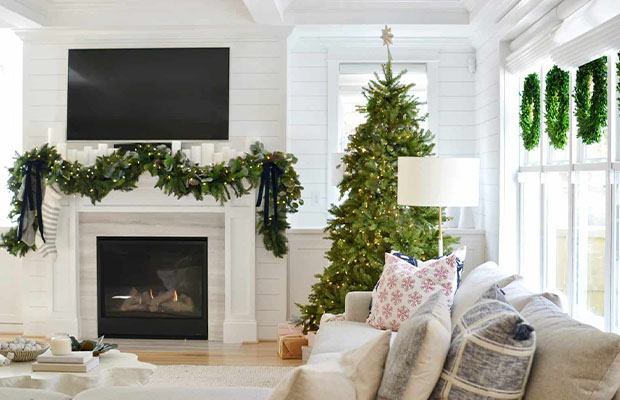
A traditional Christmas style involves hanging garland over a mantel. Garland is a quick and easy way to add texture and a splash of color to any home during the holiday season, whether it be real or fake.
You can choose between real or fake greenery, and there are many different types of garland you can use (my favorites are eucalyptus, magnolia, and cedar). Of course, faux garland will last a lot longer and is simpler to work with, shape, and accessorize.
In this post, we’ll explain how to hang garland on mantle and things you need to prepare. Keep reading!
Table of Contents
How To Hang Garland On Mantle?
Step 1: Gather Your Mantel Decorations
The first step is to gather all of the garlands and accents you’ll need to decorate your mantel. Stack similar items together. To avoid missing a step or having to start over, you’ll want to consider the order in which you’ll attach the items to the garland.
Step 2: Clean The Mantel
The mantel should then be cleaned. Just wipe it down with a clean dry or slightly damp rag but don’t use any cleaning product. In the following section, I’ll explain why.
Step 3: Affix Command Hooks To The Mantel
Use rubbing alcohol to clean the surface before applying Command hooks to it. As a result, adhesion is improved. This is why you shouldn’t use a cleaning product first because it will reduce the rubbing alcohol’s effectiveness.
It is important to use the right size hook for your situation. These Command mini hooks worked well because my garland was relatively light and only slightly protruded from the front of the mantel (option 2). I use clear hooks to ensure they won’t be seen in the arrangement.
How To Hang A Heavy Garland
Use larger Command hooks or place two or more smaller hooks in the same place to distribute the weight if you want to hang a garland that is very heavy. Make sure to adhere to the Command hook instructions precisely and give it enough time to adhere to the surface before hanging anything on it.
You’ll want to affix the Command hooks to a horizontal surface (the top of the mantel), as opposed to a vertical surface (the face of the mantel). The hooks will be able to support more weight and remain stable as a result.
Put the hooks on the front of the mantel at least an inch away. Attach at least one to the top of the mantel in each corner and the center. You should add extra hooks as necessary, one at each end of the scallops, if your garland (option 3) will be swagged on the front of the mantel and feature multiple scallops.
Step 4: Lay The Garland On The Mantel To Determine The Length
To what extent your garland will hang down the mantel’s sides is your goal in this step. Since my garland was only 5′ long and I knew I wanted to extend it at least a foot on each side, I had to use two garland.
Step 5: Wire Multiple Garlands Together
Use floral wire to connect the garland strands if you’re using more than one. 22 gauge floral wire was employed. With small overlap, arrange the end of the garland to end. Be aware of the natural “direction” of your garlands.
Step 6: Secure The Garland To The Command Hooks
Now that your garland is in the proper location and is the appropriate length, you can fasten it to the hooks. You can do this in one of two ways: you can tuck a branch of the garland into the “u” of the hook, ensuring it fits snugly. Alternately, if you want to add more security, wrap one end of the floral wire around the garland and then the other end a few times around the hook.
Step 7: Fluff Out The Garland
The garland’s leaves and branches can be spread out gently using your fingers. The garland needs to have shape and volume. Don’t stress about it being flawless. A more organic appearance is lovely.
Step 8: Add In Branches And Sprays
To give your garland dimension, texture, and extra fullness, you can add more branches and sprays. The branches should be tucked in and secured with floral wire. Make sure they are positioned facing the same way as your garland.
Step 9: Add In Decorative Accents
The smaller accents can then be added after the larger branches and sprays have been positioned. Here, I added all of the magnolia leaves first, placing five clusters along the length of the garland. I followed that by adding the red-seeded eucalyptus berries. Place your accents in various locations. Anything that is too organized will appear fake and unnatural.
This is also the time to add any ornaments your garland may have. Although you can add your ornaments one at a time, clustering them will make a bigger impact. Before attaching the ornaments to the garland, wire the ornaments collectively (odd numbers look best).
Step 10: Add In Accessories
Everything that isn’t anchored or attached to the garland should be added as the last step. You can see where I added the stockings, stocking holders, candles, owl, birds, and birds of paradise above and below the garland.
The garland is finished after that. I hope this makes it easier for you to make and hang your garland and design a lovely mantel display!
Read More: How To Make Flower Arrangement?
Things You Need To Prepare
1. Command Hooks
For hanging wreaths, garlands, and stockings on my mantel, door, or wall without nails, command hooks are by far the best thing I’ve found. If you haven’t used them yet, they are tiny hooks with double-sided tape on the back that isn’t damaging. I purchase mine from this location or from a hardware store like Home Depot. They come in various sizes, ranging from tiny to larger ones to hold items that are light or a little heavier. I attached a few to the sides and back of my mantel (although, if a hook is hidden on the side, I occasionally just use a nail for it).
I also use larger command hooks to hang the wreaths, particularly in places where there is no other option or when I would rather avoid making a hole with a nail, like in my planked walls. Additionally, they can be used to hang garland around or on doors or windows.
When you take the hooks off, they usually don’t harm the paint or the walls, but always use caution and adhere to the manufacturer’s instructions. Make certain the area is clean, dry, and dust-free before you attach a hook to it.).
If they are too close to the fire, I don’t think they will stick as well (my decorations have occasionally fallen over, probably due to the adhesive melting!), but if decorations are that near the heat they probably shouldn’t be hung there just for safety reasons. In order to prevent anything from getting too hot or breaking, I take the precaution of picking up any ornaments that are in the way and placing them on the mantel or another surface when we have a fire.
2. Twine, Thread, Ribbon, Or Clear Fishing Line
To hang stockings or ornaments at various heights, you can use brown twine, as I did on my mantel, for a slightly more rustic appearance, or you can use a festive ribbon, plain clear fishing line, white thread, or string, depending on the style you want.
Last year, I used a clear fishing line to hang gold mirrored ornaments from my dining room lantern so that, from a distance, all that is visible is the ornaments themselves. Stick a command hook in a stealthy location if you’re hanging the ornaments from a mantel or window, and then hang the ornaments from the hook with thread, fishing line, ribbon, or twine.
3. Big Sticks Or Branches
I used a birch branch that I found while out for a walk this year for my mantel! Although I could have tied it down to the command hooks as an extra measure of security, it was heavy enough to remain on the mantel without assistance. Directly from the branch, my ornaments are suspended. I placed the branch on some colorful beaded string lights and wrapped some of the wires around it to add a little extra sparkle. I hung a branch across our window and ornaments from it last year, and I love it. Instead of each ornament, I only needed to use a hook to hold the branch.